Winnie the Pooh CAL part 3

Hi all! Sorry again I completely forgot about posting this part last Friday and yesterday I interrupted myself by the Sleeping Beauty post but here it is.

Today is a bee. As simple as that. It is the one who makes the honey, Pooh so much likes and it makes the set look adorable. On my next post I will share with you the layout I have planned out to join together and add a border.

To this block I will still add a line around the wings of the bee but I will show you the last details at the end. Right now lets focus on having all 9 squares done. I like adding the details at the end before joining cause it goes faster for me. The wings come in a cream color. The materials are listed below.

2 skeins of white

1 skein of black

1 skein of yellow

1 skein of cream

I have no more to say so here is the graph and the example block.

bee

Sleeping beauty Decoration tutorial

Hi all! I totally forgot I had to post on Friday the last Winnie the Pooh block, but I went out with some friends and then the visit extended for dinner in one of my favorite restaurants in Den Haag (not that I know many, but this one is delicious) and then weekend started and we went out and about and didn’t even remember to blog.

So, today is a special day for us Disney fans. 58 years ago, was the release of one of my favorite childhood Disney princess. The Sleeping Beauty was released for the 1st time in Los Angeles, on January 29, 1959.

To celebrate I made this beautiful Sleeping Beauty frame for my daughter’s bedroom. It is so easy that it took me less than 20 minutes.

You will need:

A frame

A sleeping beauty silhouette taken from a coloring book.

2 scrapbook papers in blue and pink (you know as the dress)

Glue, scissors and paper

Instructions

Trace the silhouette on one of the papers. I decided to do it on the pink because that was my favorite color from the fairy godmother’s choice. And the background stays in blue.

Then cut the scrapbook paper silhouette, and paste on the other one.

Put into the frame and that’s it.

Now repeat with any other princess you like.

Happy anniversary Sleeping Beauty!

Mexican Recipe: Pastel Azteca

I would say there are two categories regarding Mexican Food, like real Mexican food, not including texmex because that’s another story.

First we have the culturally traditional, fancy if you want, complicated recipes, known by every Mexican such as Tamales, Cochinita Pibil, enchiladas, sopes, Mole, Chile en Nogada and much more which are internationally known and admired in the gastronomical world. These are eaten on special occasions such as independence day, Christmas maybe and other celebrations. These are the meals I miss and try to eat at least once every time I am in Mexico as cooking them outside is hard cause you need lots of very local ingredients. But then you also have the home traditional meals, regional and different for every state and city in our country. The ones, your mom used to cook cause are passed on by generations, the ones that vary from one family to the other even though it’s the same recipe and they don’t stop from being real Mexican food.

The recipes Im sharing and adapting to the dutch ingredients or better said to ingredients that can be easily found here are in this last category. They are Mexican, but not the kind you will always find in a restaurant but the ones our people truly eat at home regularly, for instance like picadillo.

And the recipe I’m sharing today, my dear readers, is my favorite… Well, one of my favorites to be fair. It is called Pastel Azteca, which translated literally would be Aztec Cake. It’s like a Mexican lasagna.

My friend Diana, requested this recipe and I have to say, it is not very easy to find all of the ingredients here but thanks to the internet you actually CAN find them all and I’ve got you covered if you want to give it a try cause I will mention every seller who has said materials. Click on the links to find out.

Let’s get started.

Ingredients for 4 to 6 people.

16corn tortilla (the real ones not the ones from the supermarket)

3 chicken breasts boiled and shredded.

4 puntpaprika cooked and cut fajita style. (the original recipe is with poblano pepper)

2 small onions sliced

Lots of cheese to your taste

Tomatillo sauce or in case of not finding it, then use tomato sauce made by boiling and blending 3 tomatoes, 1 small onion and 2 garlic cloves with salt.

Optional: sour cream and corn

Don’t forget the salt and pepper to taste.

Preparation:

This time I didn’t have my tortillas made so I had to make them from scratch by using Maseca and following instructions in the package. You need a special device to make them flat and round and a pannenkoek pan in case you don’t have a real ‘comal’.

And also the punt paprika is prepared in advance by burning the skin, then setting them in a bag to steam for about 10 minutes and then clear them from burned skin, take off the stem and the seeds and slice. After that, saute the onions in a pan together with the punt paprika and you are ready to go.

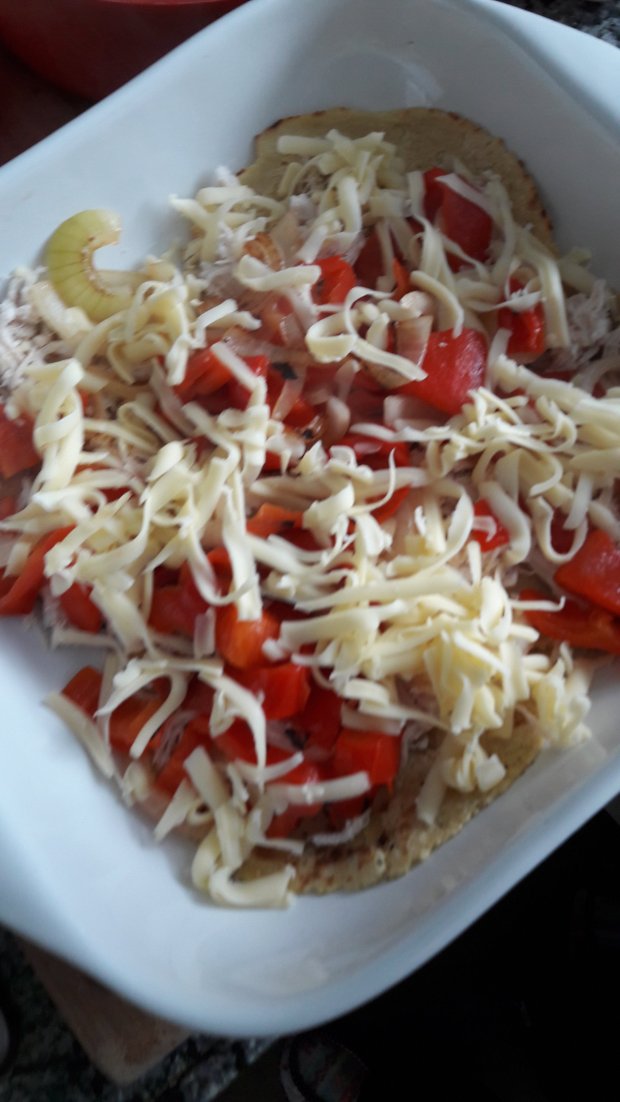
When you have all the ingredients ready the steps are quite easy. Set a bed of tortillas in a baking bowl like in the picture. Then spread a layer of chicken, the punt paprika-onions and cheese. Here you can also add a bit of cream and corn if you like and cover in some of the sauce. I used two packs of sauce for this recipe. Then add more layers in this order, tortilla, chicken, punt paprika and onions, cheese and sauce until you end up with only tortillas and cheese and cover up in sauce.

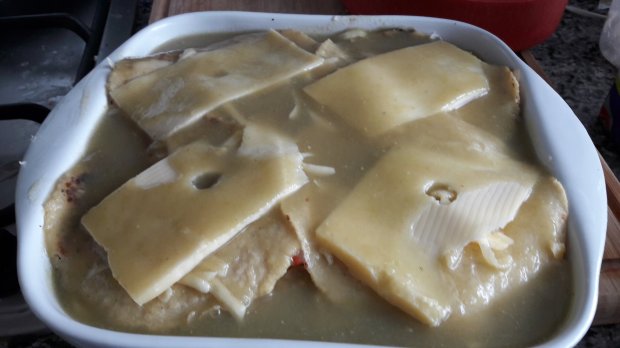
Put in the oven covered with foil paper until the cheese melts and not burn like mine (baby was crying so I left it a bit longer and forgot the foil paper but still good, only the top cheese was burned 😂)

When you take out of the oven, cut it as if it was a lasagna and enjoy. If you are like me, I add more cheese and more sauce at the end and put it 30 seconds in microwave to melt the last layer of cheese. I love everything super cheesy. That’s it.

Please let me know if you made it and what do you think. I would love to read your comments. Tot ziens!

Winnie The Pooh CAL part 2

How are you doing with your blocks? I am missing just 1 from each of the blocks I will be sharing with you.

Today´s block is a ´hunny´pot. It is as you know, containing Pooh´s favorite food: sweet honey. And you know, I like Winnie Pooh, cause he is my kind of guy when it comes to eating.

¨”It is more fun to talk with someone who doesn’t use long, difficult words but rather short, easy words like ‘What about lunch?'”

best-funny-quotes-winnie-the-pooh

Here is the block for today.

For it I used:

1 skein of white yarn

1 skein of purple yarn: The brand I used for this one was Katia Planet in color Violet 3963. This was the first time I used this yarn and I LOOOOOOVED it! It feels so soft and fluffy and there are many color choices which is good when you like making colorful projects.

1 skein of lila yarn: I used Scheepjes Colour Crafter in 1432 Heerlen.

1 skein of black

1 skein of yellow: also used Scheepjes Colour Crafter in 2008 Leuven, fun fact I lived in Leuven in 201,where I retook crochet after more than 10 years without it.

I haven’t decided if writing hunny on it so for the moment I’m leaving it like this. What do you think? Should we do it or not? Leave me a comment to let me know.

If you dont know what I´m talking about here with the blocks and the CAL and the Pooh… well, hurry up and catch up with us by checking this post. I´ll post the last block this friday and next week we will have the instructions to put together the blanket.

Here is the graph for today.

hunnypot

Enjoy crocheting.

Fantastic Bake Along: Mary Berry Gingersnaps

This is my first bake along since my friend Lucia from Crochet, Knit and moretold me about it. We share a lot of common interests and when she told me about this I knew I had to be part of it. And it’s funny because around the time she told me, I was already thinking on looking for some baking lessons or courses to improve my baking skills. I’ll tell you more about it on other posts in the future.

The fantastic bake along is hosted monthly by Tracy from Its a sweet day. Since I follow her almost 2 or 3 months ago, the recipes look yummy but I haven’t had the time to make them. And this week I was a bit busy that only today I could give them a shot.

The recipe for this month was given by Rebecca@Twinklehook. She had chosen to make the Ginger Snaps by Mary Berry who is a judge on “The Great British bake off”. Now, I know the show but I only watch it when I’m in London which is like once a year maybe (because I tag along with my husband’s business trips). Anyways, my friend Lucia also told me “It’s Mary Berry! ” like I’m suppose to know her, but she is surrounded by British so to her its a well known name, so it was funny because for me it was like hearing any other name, so I googled her and then I remembered seeing her on the show the 3 times I’ve watched it.

But without more storytelling here is the recipe I followed.

Mary Berry’s Ginger Snaps

  • 60g butter plus extra for greasing
  • 90g golden syrup
  • 125g self raising flour
  • 2tsp ground ginger
  • 1tsp ground cinnamon
  • 1/2 tsp bicarb soda
  • 1tbsp caster sugar
  1. Grease baking trays
  2. Combine butter, golden syrup in a small sauce pan and heat until melted. Leave to cool slightly.
  3. Sift flour, spices and bicarb into bowl. Stir in sugar, add the cooled syrup mix and stir to make a soft but not sticky dough.
  4. Roll dough into balls of the size of walnuts and Place well apart on baking tray, flatten the balls slightly.
  5. Bake in preheated oven 190 degrees for about 15 minutes.

I was happy as none of the ingredients were complicated and I already had most of them at home except for the golden syrup which is one I have never heard before. So I went shopping and looked for it but only found other kinds of syrups so I took the one that looked golden (silly me but I’m very practical so when I don’t find something I substitute it for what I think will work in a similar way) I used Agave syrup which it’s also supposed to be healthy so there, these are healthy cookies so no guilt while eating them.

The steps to make the cookies were easy to follow and I only got confused on the temperature of the oven since it said degrees and being used to American terminology I assumed it was Fahrenheit but Lucia again got me out of my doubts and told me Britain also uses Celsius. You see, always learning… Love it!

Now with the right temperature the 2nd batch of cookies turned out amazing: crispy on the outside and chewy on the inside. They taste like Christmas which is perfect, cause you know, I love everything Christmas. The house smelled lovely while they were in the oven. It gave a nice atmosphere inside for a cold winter day.

I’m gonna make them again for sure and will be added to my recipe book where I’m saving and collecting all the yummy recipes I’m learning during my wife and mom years to pass on to my children some day.

For now, I’ll grab another cookie, drink a sip of my tea and crochet while binge watching Friends on Netflix.

Winnie the Pooh CAL

As you know, I love everything Disney and I have great Disney crafts coming your way on special Disney dates.

events-winniethepooh

Today is Winnie the Pooh day and to celebrate it I am hosting a Crochet Along (CAL). I will post 3 different blocks to make a blanket with the cute bear and some other images inspired in this character. The blanket will be made of 9 squares in total made in C2C technique. Each block measures about 40 x 40 cms. You could make more blocks if you want or even less.

The blanket will make a perfect gift for a new baby to come, depending on the size it could be a box blanket, or a crib blanket.

Well, the idea for this crochet along is that I´m gonna post every 2 or 3 days a block so you can have time to do at least 3 blocks of each design. Once we have all 9 blocks we will join them all. I will provide a layout but you can change it of course to your liking. Then we will add a border, so hopefully in around 2 weeks we can have a beautiful Winnie the Pooh inspired baby blanket.

The materials you will need for the first one are:

1 skeins of white

1 skein of golden yellow for Pooh

1 skein of black

1 skein of brown

4.5 mm crochet hook

scissors and needle

The first square is here for you.

winniepooh

Remember to do 3 of this.

See you in a few days to share with you the next block.


Mono de Nieve comestible 

Esta semana comenzamos con las clases de español en casa con mi hijo de 4 años. La bebé también escucha y estará participando más adelante pero en lo que nos vamos organizando y sacando adelante los temas, ella está de oyente 😂😍

Cada semana iremos viendo un tema diferente y lo veremos de forma integral abarcando los campos formativos que promueve la SEP para el nivel preescolar. 

Está semana nuestro tema fue de Invierno. Tenemos un vocabulario que aprender y nos estamos enfocando en una letra, un número, y una figura y de ahí partimos para tocar temas matemáticos, artísticos, de exploración del mundo, etc. 

Hoy nos tocó hacer una receta super simple y que causó mucha emoción en mi pequeño. Nuestro mono de Nieve comestible lleva fruta y un pedacito miniatura de verdura pero supongo que ustedes pueden ajustarlo a lo que tengan a la mano. Por ejemplo si viven en México pueden hacerlo de jicama en vez de galletas de arroz o usar otras frutas que tengan a la mano. 

Esto es lo que ocupamos:

2 galletas de arroz inflado.

1 banana cortada en rodajas delgadas

3 fresas cortadas a lo largo, delgaditas

3 chispas de chocolate confitado

5 o las necesarias chispas de chocolate para derretir, nosotros usamos chocolate negro. 

Coco rallado

Una rodaja de manzana del lado de la piel y cortandole una tira de un lado para crearle una base

Pasitas amarillas 

El procedimiento es super sencillo y pueden hacerlo según su creatividad. 

Ponen las 2 galletas de arroz formando el mono de nieve, luego le agregan los plátanos y sobre ellos una lluvia de coco rallado. 

La bufanda se hace con las fresas y los botones con el chocolate confitado. Los ojos y boca con las chispas de chocolate y el gorro con la manzana y las pasas.

Y no se les olvide la nariz con la zanahoria. Mi hijo fue muy específico en pedir que usaríamos zanahoria para ella. 😁 Como pueden ver su sonrisa llena de extras de chocolate muestra que estaba feliz con su snack hecho por el mismo. 

Pueden también hacerle las manos con palitos de pan o pretzel. 

Ahora si que lo disfruten sus peques. 

Platiquenme en los comentarios si lo hicieron y que les pareció a sus niños. 

Chocolate Raspberry Cake 

Do you want to make a delicious cake for a special occasion? I got your back friend.

Today is my husband’s birthday and he loves being spoiled on his special day. He usually asks for a cake with Nutella and strawberries, which I was ready to prepare but for some reason he told me to do any cake I’d like as long as it was a chocolate cake. 

So yesterday my kids and I went shopping for the ingredientes when my son, who was very excited to prepare the birthday surprises for his daddy decided he wanted raspberries on the cake and there I figured I would do a new cake and just see how it turned out. 

Now, it is delicious. It turned out really sweet but the raspberries give a nice touch to balance the flavors. You kind of need a big glass of milk to eat it and those are my favorite kind of chocolate cakes, cause you know I’m more of a cheesecake kind of girl… But here is the recipe. Is super easy.

Ingredients

Your favorite chocolate cake recipe. This time I didn’t make it from scratch, but I used devil’s food cake from Betty Crocker

2 sticks of Butter

3 cups of powdered sugar 

2/3 cup of cocoa powder 

1 spoon of coffee 

1 spoon of vanilla 

Nutella 

Fresh raspberries 

Raspberry jam 

Milk

Preparation

  • Make your batter and separate in 3-8 inch pans. Bake until a toothpick comes clean. Approximately 20 mins each. Set to cool. 
  • Make the icing, put the sticks of butter on the mixer and add the vanilla, then add the cocoa powder slowly and some milk (be careful to add it slowly to achieve a smooth consistency but not to liquid otherwise you won’t be able to spread it properly) 
  • Add the coffee to the mix and then the sugar cup by cup also adding milk by the spoon until the consistency is proper for a buttercream icing. It took me maybe 3 tablespoons of milk but sometimes can take more or less. 
  • Set the first layer of cake on a plate and then on top of it, add some icing with the piping bags around it but leaving the center free to add some Nutella and fresh raspberries. Put the next layer on top and repeat but put some raspberry jam on it, then add the next layer. 
  • Cover the cake with the chocolate buttercream icing. Do some decorations using the star pipe and add some fresh raspberries to the top to decorate. 

Now enjoy! 

My husband liked the cake and that’s all that matters. Happy birthday love, we are blessed to have you with us. 

 Te amamos ❤️